반응형
# Tic Tac Toe (4/4)
# Created by netcanis on 2023/09/09.
#
# Minimax
# Alpha–beta pruning
# h5파일 로딩, 게임 GUI.
# 게임 테스트.
import tkinter as tk
from tkinter import messagebox
import random
import numpy as np
import tensorflow as tf
from keras.models import load_model
PLAYER = 1
AI = -1
H5_FILE_NAME = "ttt_model.h5"
class TTT:
def __init__(self):
self.window = tk.Tk()
self.window.title("TTT")
self.init_neural_network()
self.start_game()
def init_game(self):
self.board = [[0 for _ in range(3)] for _ in range(3)]
self.buttons = [[None for _ in range(3)] for _ in range(3)]
self.sequence = 0
self.game_over = False
self.turn_player = random.choice([PLAYER, AI])
for row in range(3):
for col in range(3):
self.buttons[row][col] = tk.Button(
self.window,
text=' ',
font=("Helvetica", 24),
height=1,
width=1,
command=lambda r=row, c=col: self.make_move(r, c, PLAYER),
)
self.buttons[row][col].grid(row=row, column=col)
def find_empty_cells(self):
empty_cells = []
for row in range(3):
for col in range(3):
if self.board[row][col] == 0:
empty_cells.append((row, col))
return empty_cells
def check_winner(self, board, player):
for row in board:
if all(cell == player for cell in row):
return True
for col in range(3):
if all(board[row][col] == player for row in range(3)):
return True
if all(board[i][i] == player for i in range(3)) or all(board[i][2 - i] == player for i in range(3)):
return True
return False
def is_board_full(self, board):
return all(cell != 0 for row in board for cell in row)
def make_move(self, row, col, turn_player):
if self.board[row][col] == 0:
self.board[row][col] = turn_player
self.updateBoardUI(row, col, turn_player)
self.sequence += 1
if self.check_winner(self.board, turn_player):
self.game_over = True
elif self.is_board_full(self.board):
self.game_over = True
self.turn_player = 0
else:
self.turn_player *= -1
def wait_for_player_move(self):
player_move_var = tk.IntVar()
for row in range(3):
for col in range(3):
self.buttons[row][col]["command"] = lambda r=row, c=col: player_move_var.set(r * 3 + c)
self.window.wait_variable(player_move_var)
player_move = player_move_var.get()
row = player_move // 3
col = player_move % 3
self.make_move(row, col, PLAYER)
def wait_for_player_restart(self):
response = messagebox.askyesno("Game Over", "Do you want to play again?")
if response:
self.start_game()
else:
self.window.quit()
def updateBoardUI(self, row, col, turn_player):
self.buttons[row][col]["text"] = 'O' if turn_player == 1 else 'X'
self.buttons[row][col]["state"] = "disabled"
self.window.update()
def random_move(self, turn_player):
if self.game_over == True:
return -1, -1
row, col = random.choice(self.find_empty_cells())
self.make_move(row, col, turn_player)
return row, col
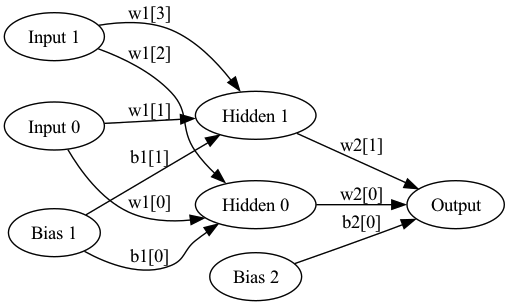
def init_neural_network(self):
self.model = tf.keras.Sequential([
tf.keras.layers.Dense(27, activation='relu', input_shape=(9,)),
tf.keras.layers.Dense(9, activation='softmax')
])
self.model.compile(loss='categorical_crossentropy', optimizer='adam', metrics=['accuracy'])
def predicts(self, input_data):
if isinstance(input_data, list):
input_data = np.array(input_data)
prediction = self.model.predict(input_data.reshape(1, -1))
sorted_indices = np.argsort(prediction, axis=-1)[:, ::-1]
index = 0
for i in sorted_indices[0]:
if input_data.shape == (9,):
if input_data[i] == 0:
index = i
break
elif input_data.shape == (3, 3):
row = i // 3
col = i % 3
if input_data[row][col] == 0:
index = i
break
#max_value = prediction[0, index]
return index
def start_game(self):
self.init_game()
self.model = load_model(H5_FILE_NAME)
while not self.game_over:
if self.turn_player == AI:
next_move = self.predicts(self.board)
row = next_move // 3
col = next_move % 3
self.make_move(row, col, self.turn_player)
else:
self.wait_for_player_move()
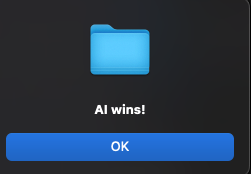
if self.turn_player == AI:
messagebox.showinfo("Game Over", "AI wins!")
elif self.turn_player == PLAYER:
messagebox.showinfo("Game Over", "Player wins!")
else:
messagebox.showinfo("Game Over", "It's a draw!")
self.wait_for_player_restart()
def run(self):
self.window.mainloop()
if __name__ == "__main__":
game = TTT()
game.run()

2023.09.12 - [AI,ML, Algorithm] - Tic-Tac-Toe 게임 제작 (1/4) - minimax
2023.09.12 - [AI,ML, Algorithm] - Tic-Tac-Toe 게임 제작 (2/4) - alpha–beta pruning
2023.09.12 - [AI,ML, Algorithm] - Tic-Tac-Toe 게임 제작 (3/4) - 머신러닝 훈련 데이터 생성
2023.09.12 - [AI,ML, Algorithm] - Tic-Tac-Toe 게임 제작 (4/4) - 머신러닝을 이용한 게임 구현
반응형
'개발 > AI,ML,ALGORITHM' 카테고리의 다른 글
| Gomoku(Five in a Row, Omok) (2/5) - 속도 최적화 1차 (minimax 속도 개선) (0) | 2023.10.27 |
|---|---|
| Gomoku(Five in a Row, Omok) (1/5) - 기본 구현 (minimax, alpha-beta pruning) (0) | 2023.10.27 |
| Tic-Tac-Toe 게임 제작 (3/4) - 머신러닝 훈련 데이터 생성 (0) | 2023.09.12 |
| Tic-Tac-Toe 게임 제작 (2/4) - alpha–beta pruning (0) | 2023.09.12 |
| Tic-Tac-Toe 게임 제작 (1/4) - minimax (0) | 2023.09.12 |

SKY STORY